by admin | Jul 6, 2014 | 1889 Swaziland Overprints
I’m always following auction listings for the higher value 1889 overprinst and often bidding on them too. This 2s6d was listed on Ebay auction ending 06 July 2014 and I found it quite interesting due to the easy to spot and identified overpint flaws, the dot between “l” and “a” and the dot in the “d”. The seller provided a nice high resolution scan of the stamp.  This looks like the position 1 contstant flaws for this stamp and just checking the perforation comb for this position by eye the dropped/raised holes and wide/narrow perfs all agreed. I’m fairly sure this is indeed a position 1 stamp from the sheet. The overprint has the full oily look which is consistent with this value. Next step for me was to measure the overprint and this is where things went wrong.
  It only measures 12.6 from S – d and some of the intermediate measurements are also slighly out. Looking at the zoomed in version of the overprint some things I pick up that also worry me are the dark frames around the letters (but I’m not sure about this and maybe its due to scanning contrast settings) and also the shapes of some of the letters. My opinion is that this is a dangerous fake overprint on a genuine stamp, in this instance even the constant flaws were forged. This stamp finally sold for USD42.76, less than 7.5% of the current catalogue value of the genuine Swaziland stamp. I hope I’m right
  Share
Share
by admin | Jun 25, 2014 | 1889 Swaziland Overprints
I’m following the procedure as used by John Kaupe in Peter van der Molen’s book “Swaziland Philately to 1968”. For this example I’ll be describing what I did in detail and then just do summaries for other twelve 1d stamps.
Working example 1:

Here is a high resolution zoom of the overprint:

Step 1: Perforation 12.5 x 12 – CORRECT
Step 2: Overprint measurement – checking the overall and all intermediate measurements and all are within the limits – CORRECT
Step 3: Nothing that stands out
Step 4: Match the perforation holes to the comb profile for the 1d which, for the 1d only one comb which makes it easier.
I again use my Photoshop skills to do this but the other way is to print large versions of the scans and match it with photocopies of the comb profiles that can be found in van der Molen’s book.
I make a selection of the perforation, paste it onto a scan of the comb profiles and then use an opacity filter of around 50% and resize my selection (keeping the same aspect ratio), to match the length of the comb scan. I firstly look for the obvious characteristics e.g. very wide or narrow tooth or severely raised or dropped perforation holes.
For this stamp the wide tooth after the 5th perforation hole stands out and also the dropped hole on the right. Only comb 8 matches this criteria and overlaying the image on the complete comb perf looks quite good. At this point I’m fairly confident that I’ve identified the right column.

I then proceed to check the side perfs and checking column 8 I just feel that it doesn’t match close enough. I go back to the horizontal line of the comb testing all 10 options and it just fits perfectly on column 1 and not on any other.

I then check the vertical perfs for column 1 and this time it matches perfectly. This stamp is definitely from Column 1.
Step 5: I now check the stamp and overprint again against the constant overprint and plate flaws identified by Kaupe for the stamps in column 1. In this column only the stamp in position 31 doesn’t have a constant flaw so my chances should be quite good to find something.
Checking for all possible flaws in this column I now notice the small dot in the overprint between the “l” and “a” in the position consistent with the top left stamp of the sheet i.e. position 1. In this position a small dot in the “d” is also listed as a constant flaw but it is missing from this stamp.
From all my analysis, in my opinion the stamp and overprint is genuine, the stamp is definitely from column 1 and I think from position 1, the missing spot in “d” leaves me a bit unsure though.
Main lesson for me from this example is that you have to verify the combs extremely accurate and it should match closely.
by admin | Jun 24, 2014 | 1889 Swaziland Overprints
In this post I’ll be looking at the 4 stamps identified as definite forgeries due to the overprints being applied on the reprint issue with 12.5 x 12.5 perforation rather than the original comb print with 12.5 x 12 perforation.
Here are the four stamps:

As a personal exercise, the idea is to check if these can be identified as forgeries by only looking at the overprints:
Here is the high resolution versions of the forged overprints from left to right:

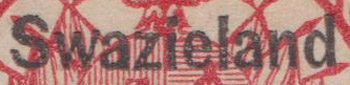


First step in verifying genuine overprints is to check if all measurements between different letters fall within the determined lower and upper limits. Peter van der Molen’s book taught me to measure from the middle of the vertical strokes of the letters rather than from the actual sides as this eliminates under- or overinking variances.
I firstly check the S – d measurement that shoud be between 12.75-12.9mm with most common being 12.8mm. Stamp 1, 2 and 4 fails this test only measuring 12.6mm. I use the ruler tool in photoshop on a zoomed in version of the overprint to quickly do these measurements. The a-n measurement on these 3 stamps also fail the test being only 6.8mm and below the acceptable range of 6.95 – 7.1mm. These measurements and the letters are consistent with the Enschede forgery of the overprint.
Stamp 2 (bottom left above) is more of a challenge as it complies to the 12.8mm overall measurement and the letters look quite authentic to me. The intermediate measurements however including (S-n, w-l, a-n, l-n) all just fall slightly outside the acceptable limits. This overprint made me realise how carefully the overprints on the correct stamps will have to checked as the variances can be very minor.
John Kaupe shows many examples of forgeries (originally described by Pirie and also his own identified forgeries). These are often clear forgeries based on individual misformed letters (e.g. a serif on the a). I’m very new to this but I can’t spot any very obvious errors. Looking closely I do feel the differences between the first a and second a and also the thin accurately shaped lines going into the vertical stroke of the d are indications of a forgery.
For me the main lesson from this exercise – there are VERY GOOD forgeries out there. Share
In part 3 I’ll start checking the overprints and comb perforation matching of the 13 potential genuine overprinted stamps.
by admin | Jun 24, 2014 | 1889 Swaziland Overprints
Armed with the amazing book I just acquired, “Swaziland Philately to 1968” by Peter van der Molen and specifically chapter 3 of the book by John Kaupe, I’m ready to start working through my collection of 1889 stamps of Transvaal overprinted Swazieland.
I’ve decided to start this journey on the 1d carmine stamp (SACC2, SG1). Reasoning behind this selection is that only one comb with perforation 12.5 x 12 was used for the genuine overprint so I was hoping it would be one of the easier stamps to work on.
First step I followed for this stamp is to check the perforation on all of them. I used a perforation guide but it can be easily checked by just counting the holes.
- For 12.5 x 12 the stamp is genuine and the overprint should be checked;
- Any 1d overprinted “Swazieland” with 12.5 x 12.5 is definitely forged.
I’ve accumulated 17 of these 1d stamps over time, without really ever checking the perforation or overprints.
The perforation measurement was quite a quick exercise and it didn’t take long to determine that 4 of the 17 stamps were definitely forgeries due to their 12.5 x 12.5 perforations.
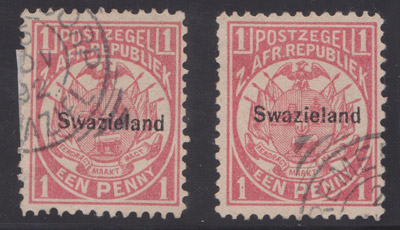
Here are the 4 forged stamps:
Here are the 13 genuine stamps where the overprints now need to be checked:


The colour of a genuine stamp is a pale carmine while the reprint is a brighter colour. The difference is quite significant and easy to notice, these were all scanned with the same scanner settings.
In Part 2 of this series I will look at the overprints on the 4 forged stamps and see if I would’ve been able to identify them as forgeries by only examining the overprint. Share